


Corny Keg: The Complete Guide (Sizes, Parts, Pressure, Carbonation & More)
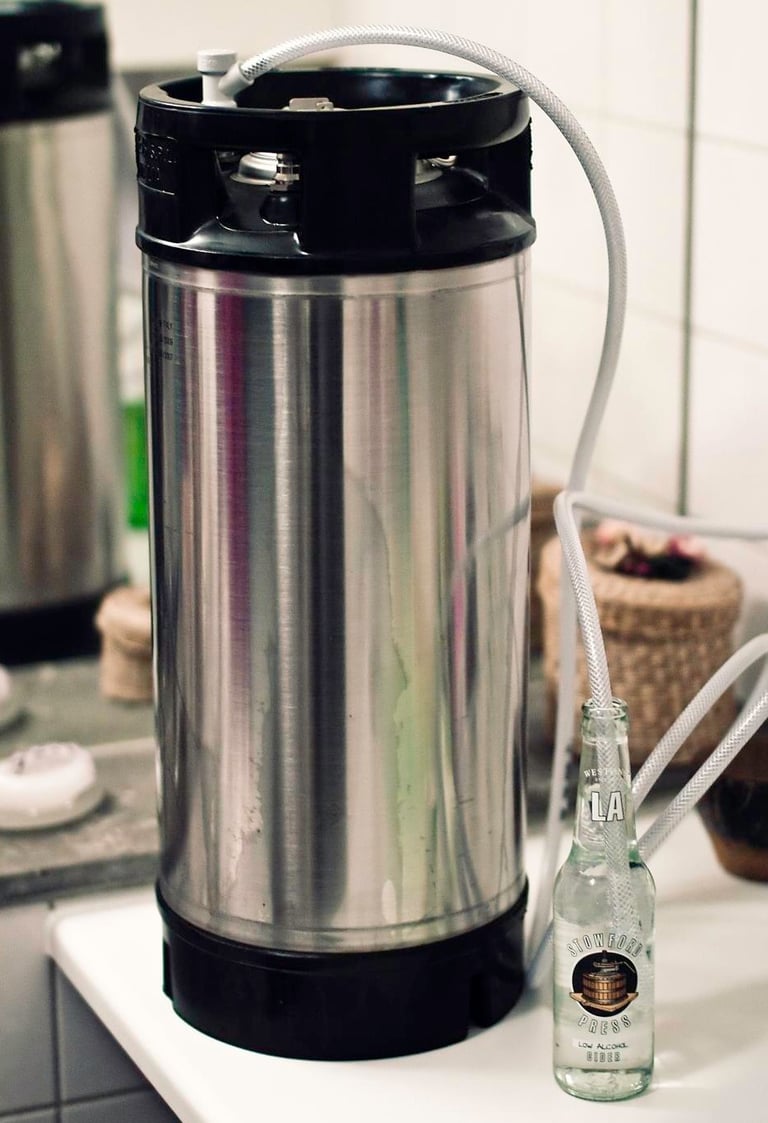
A Cornelius keg, usually referred to as a corny keg, started life in the soda industry. Soft drink companies used corny kegs to ship premixed, fully carbonated Pepsi and Coke to restaurants and bars, where the keg connected straight into the fountain system as a pressurized package. When the industry moved to cheaper “bag in box” syrup, huge numbers of stainless corny kegs became surplus, and homebrewers quickly adopted them as compact, serviceable pressure vessels for draft beer and other carbonated drinks.
Most corny kegs you see today fall into two hardware families. Historically, Pepsi favored ball lock hardware and Coca-Cola favored pin lock hardware, which is why you still see both patterns in circulation on the used market. For practical purposes, every corny keg has three functional zones: the body that holds the beer, the lid and pressure relief valve at the top, and the gas and liquid posts that define how you connect it to a draft system.
What Exactly is a Corny Keg?
A corny keg (Cornelius keg) is a refillable stainless steel keg with a removable lid and separate gas-in/liquid-out posts that’s ideal for homebrewers because it’s easy to clean, rebuild, leak-test, and run closed transfers with ball-lock or pin-lock hardware.
Compared with standard kegs, a corny keg is built for hands-on use and easy service rather than distributor-only handling. Instead of a fixed top, it uses a wide removable lid you can reach through, separate gas and liquid posts with quick disconnects, and simple dip tubes you can pull, clean, and swap without special tools. That’s what makes a corny keg unique; you can fully open and scrub the interior, purge and pressure-transfer with minimal oxygen pickup, and repurpose the same shell for beer, seltzer, soda, or cocktails with ease.
For homebrewers and small-batch setups, those details add up to clear advantages over other kegs: 5-gallon corny kegs and 3-gallon corny kegs match typical homebrew batch volumes. Corny keg parts are affordable, and their small sizes fit easily into kegerators and other containers. If you want a flexible, serviceable keg you control end to end, a corny keg is usually the most practical starting point for novice and seasoned homebrewers alike. (Quick capacity conversions: 5 gal = 640 oz = ~53 pints • 3 gal = 384 oz = 32 pints • 2.5 gal = 320 oz = ~27 pints)
Corny Keg Sizes & Dimensions
A corny keg’s size is more than the number of gallons in the product title. Corny keg dimensions such as height, diameter, and post style determine whether the keg fits your fridge, kegerator, or chest freezer hump, and how much beer you can move in a single vessel. The table below summarizes typical values for the most common capacities, based on published Cornelius keg and torpedo keg specifications.
|
Keg Size |
Nominal Volume |
*Typical Height |
*Typical Diameter |
Approx. Empty Weight |
Approx. Total Filled Weight |
Typical Posts |
|---|---|---|---|---|---|---|
|
Mini corny keg |
1–1.5 gal (4–6 L) |
~10.25 in (26 cm) |
~9.0 in (23 cm) |
~5 lb |
~13–18 lb |
Ball lock |
|
Small corny keg |
2–2.5 gal (8–9.5 L) |
~14.5–15 in (37–38 cm) |
~8.4–9.0 in (21–23 cm) |
~7–7.5 lb |
~24–28 lb |
Ball lock |
|
Compact corny keg |
3 gal (11.4 L) |
~17 in (43 cm) |
~8.5 in (22 cm) |
~6–7.5 lb |
~31–33 lb |
Ball lock or pin lock |
|
Standard corny keg |
5 gal / 19 L |
~24.75 in (63 cm) |
~8.5 in (22 cm) |
~9–11 lb |
~51–53 lb |
Ball lock or pin lock |
|
Large corny keg |
10 gal (38 L) |
~24.75 in (63 cm) |
~12.25 in (31 cm) |
~25–28 lb |
~108–111 lb |
Ball lock |
|
XL corny keg |
15 gal (57–58 L) |
~24.75–36 in (63–91 cm) |
~12.3–16.0 in (31–41 cm) |
~32–45 lb |
~157–170 lb |
Ball lock |
*Total filled weight assumes ~8.34 lb/gal liquid; exact totals vary by keg make and true fill volume.
Most corny keg “standard” specs vary slightly by manufacturer (Cornelius, AEB, Torpedo, and others) and by handle/lid style, especially on used kegs. Treat the numbers above as a reliable planning range, then measure your exact keg before you buy a fridge or commit to a keezer layout. Also plan for extra clearance: ball-lock disconnects and hoses typically add about 2 inches of height above the bare shell, and you’ll want room to access the PRV and swing/remove the lid during cleaning.
Anatomy & Parts
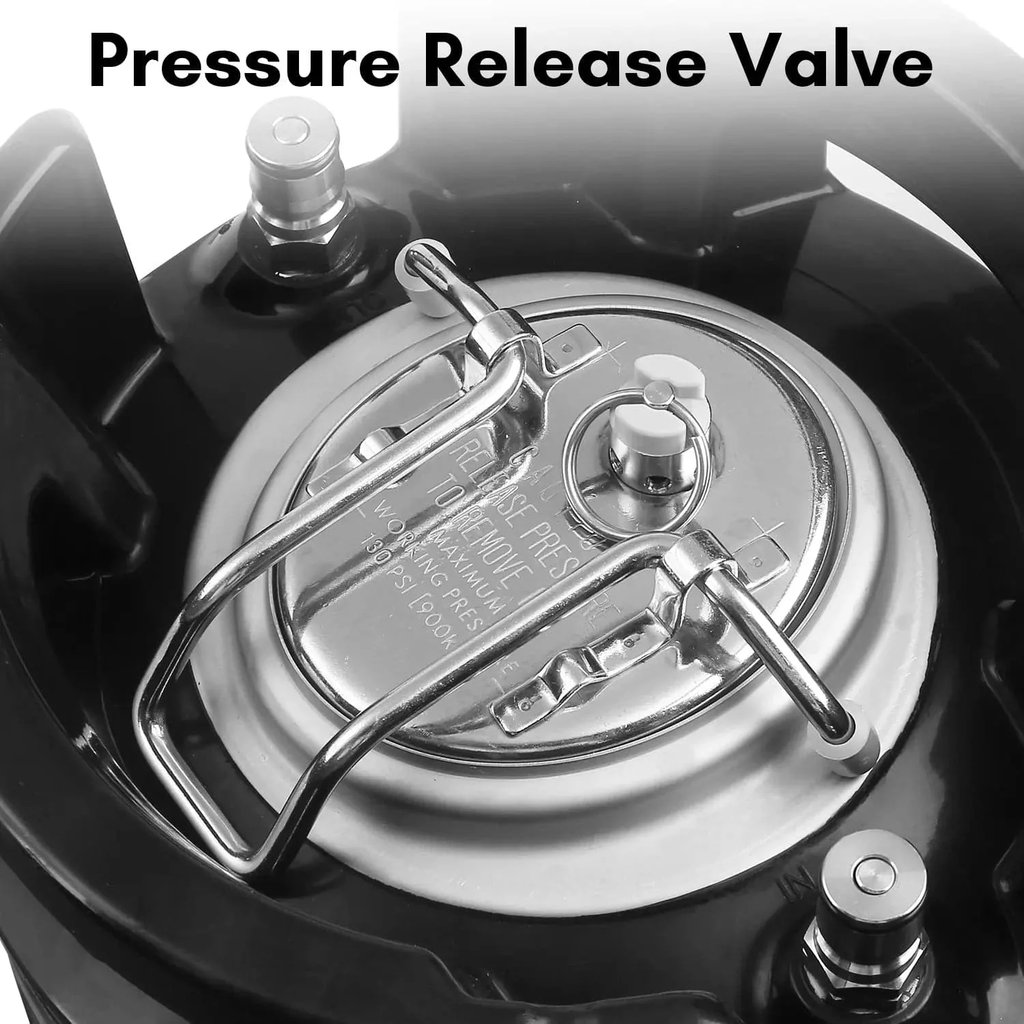
A corny keg is simple once you break it down into its main components, but these components are what determine whether it holds pressure reliably and pours clean beer. At the center is the large oval opening, sealed by a stainless lid that clamps into place and compresses a thick O-ring against the keg body. Most lids include a built-in pressure relief valve (PRV) so excess gas can be vented safely during carbonation, serving, or cleaning.
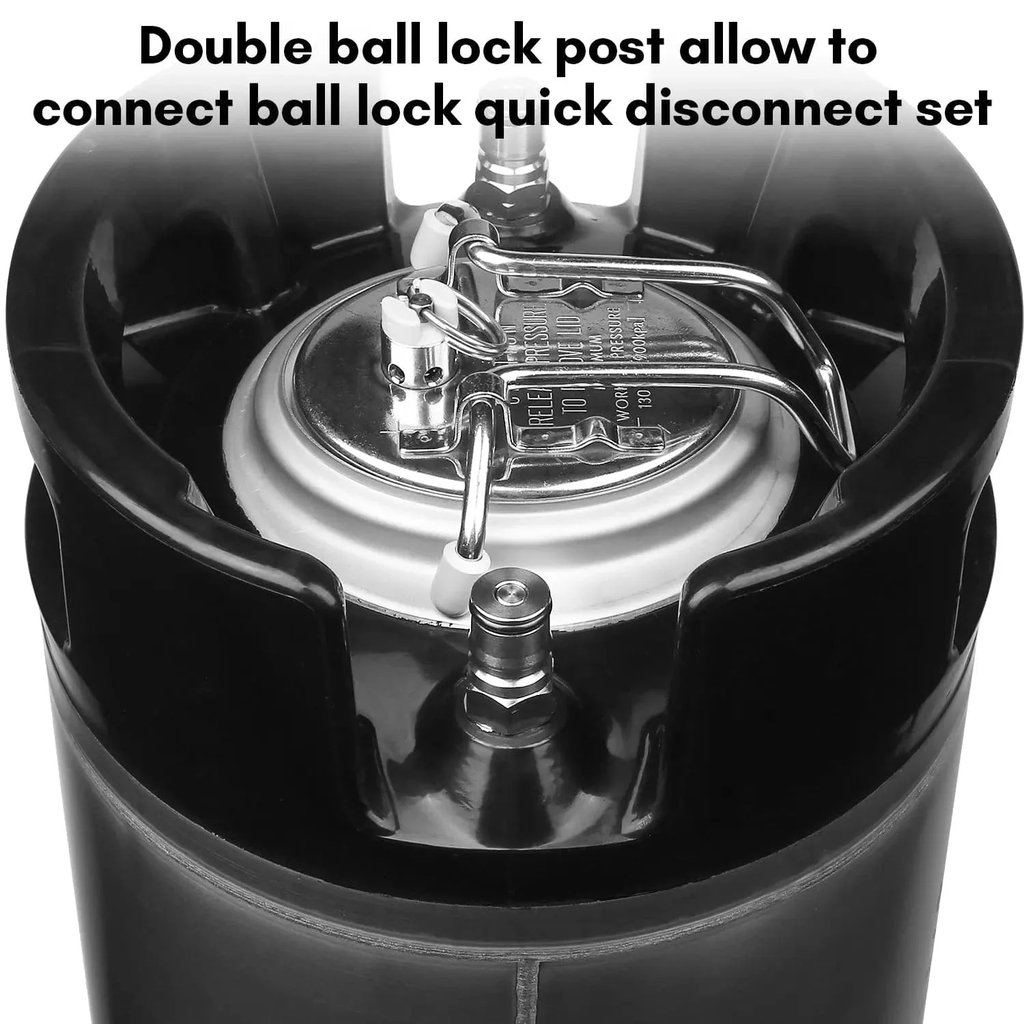
Two threaded posts sit on the top dome: one for gas in and one for liquid out. Each post contains a spring-loaded poppet valve that stays closed until a connector is attached, and each seals with its own small O-ring. Inside the shell, matching dip tubes plug into those posts. The short gas tube releases CO₂ into the headspace, while the long liquid tube (aka the dip tube) reaches the bottom of the keg to draw beer out.
Dip tubes come in two forms. Traditional fixed tubes are made of rigid stainless steel, drawing the liquid out from the bottom of the keg. Floating dip tubes replace the solid metal tube with flexible tubing and a small float, so beer is drawn from the top of the keg where the liquid is the clearest. This reduces hop and yeast pickup in beer, and fruit pickup in batched cocktails, though they can kink or clog if installed poorly.
The corny keg is connected to the rest of the draft system via quick disconnects, often called corny keg connectors or fittings. They attach the gas and beverage lines to the posts and are sold with either barbed ends for hose clamps or threaded flare fittings for modular draft setups. Worn seals inside these connectors are one of the most common causes of slow CO₂ leaks.
Every sealing surface in a corny keg depends on O-rings. They keep the gas in the keg and prevent leaks. These inexpensive parts are the most frequent maintenance items on any kegging system. Many brewers routinely replace all O-rings when buying used corny kegs and then swap them again every year or two.
Corny Kegs vs Standard Kegs (And Why It Matters)
When people refer to a “standard keg,” they usually mean a commercial Sanke keg, which is the kind that breweries send to bars. A Sanke keg is built for distribution efficiency: the top is sealed, the spear stays in place, and one coupler handles both gas and beer. It’s perfect when you have a keg washer, a dedicated draft system, and staff who never need to look inside the shell. For small-batch homebrewers, however, that sealed design makes cleaning, tinkering, and troubleshooting far more difficult than it needs to be.
A corny keg flips those priorities. A corny keg’s big removable lid allows easy access to the inside of the keg so it can be scrubbed with PBW (a professional-grade cleaner used for brewing equipment), and you can actually see what’s going on inside. Separate gas and liquid posts mean quick disconnects, easy closed transfers, and simple line swaps. Common 3- and 5-gallon sizes line up with typical homebrew batch volumes, and the shorter, narrower profile fits neatly into keezers (aka a chest freezer that has been converted into a kegerator) and kegerators. In short: Sanke kegs are optimized for commercial workflows, and corny kegs are optimized for people who want control, flexibility, and small-batch convenience at home.
|
Feature |
Corny Keg |
Regular/Commercial Keg (Sanke Keg) |
|---|---|---|
|
Opening |
Large, removable oval lid you can fully reach through |
Small, fixed spear and valve assembly at the top; shell itself never opens |
|
Cleaning |
Easy to clean manually with brushes and PBW; you can see and scrub every surface |
Requires specialized keg washer or spear-removal tools; internal surfaces are hard to access by hand |
|
Connections |
Separate gas-in and liquid-out posts using ball-lock or pin-lock quick disconnects |
Single integrated valve that handles both gas and liquid via a specialized Sanke coupler |
|
Internal Hardware |
Two dip tubes (gas and liquid) are simple to remove, clean, or replace |
One long spear assembly that is factory-installed and not intended for frequent removal by home users |
|
Typical Use |
Homebrewing, pilot batches, cold brew coffee, cocktails on tap, kombucha, and draft soda |
Large-scale commercial breweries, distributors, and bars running standard draft systems |
|
Batch Size |
Most common sizes are 1.5–5 gallons, matching typical homebrew and test-batch volumes |
Common sizes are 1/6 bbl, 1/4 bbl, 1/2 bbl and up, geared toward commercial serving volumes |
|
Customization & Access |
Easy to open, add dry hops, fruit, or adjuncts, then reseal; ideal for homebrewing experiments |
Much harder to open and reseal safely; not designed for frequent hands-on recipe tweaks |
|
Portability |
Shorter, lighter options (3–5 gal) are easy to move, fit in cars and coolers, and work well in keezers or kegerators |
Larger, heavier shells are awkward to move and usually live in one place once tapped |
|
Draft System Compatibility |
Perfect for dedicated homebrew draft setups built around ball-lock or pin-lock hardware |
Best match for bar-style draft systems already set up with Sanke couplers and commercial keg logistics |
|
Best For |
Brewers and homebrewing enthusiasts who want maximum control over cleaning, tinkering, and closed transfers on small batches |
Professional operators who prioritize standardized, high-volume, low-touch keg handling across many accounts |
Types: Ball-Lock vs Pin-Lock (and Torpedo / Sankey Conversions)
Ball lock and pin lock describe the way the quick disconnects latch onto the posts, and that difference goes back to soda contracts. Pin lock kegs with bayonet-style posts were used primarily in Coca-Cola fountain systems, while ball lock kegs with smooth posts and ball-detent connectors went with Pepsi systems.
- Ball lock corny keg: Uses smooth posts and ball-detent quick disconnects. Typically taller and slimmer, so it fits more easily in many kegerators. Most new kegging kits, torpedo kegs, and accessories are designed around ball lock hardware, which makes a corny keg ball lock the default choice for new buyers.
- Pin lock keg: Uses bayonet-style posts with pins instead of smooth posts. Usually a little shorter and wider than ball lock kegs. Often cheaper on the used market, but the larger diameter can limit how many kegs you can fit in a given fridge or keezer.
- Torpedo keg: A modern, straight-sided Cornelius keg with ball lock posts. The stackable shape and consistent stainless steel shell make packing and stacking in tight spaces easier.
- Sankey conversions:Use adapters so one draft system can run commercial Sankey kegs and ball lock corny kegs on the same beer lines.
Setup: From Box to First Pour
Unboxing a corny keg is exciting, but that first clean pour depends on what you do before any beer cocktails go in. Follow these steps once and you can treat every ball lock corny keg or three-gallon corny keg in your keezer the same way:
- Strip the keg completely: Disassemble the keg fully so you can inspect the lid, posts, dip tubes, and all other corny keg parts.
- Replace every soft part: Replace every O-ring with fresh ones and use a very light smear of keg lube on seals only.
- Clean, sanitize, and leak test: Clean with Powdered Brewery Wash, rinse well, then fill with sanitizer, pressurize, and spray around lid, posts, and the pressure release valve (aka PRV) to test for leaks.
- Confirm post orientation: On a ball lock corny keg, the notched post represents “gas in” (grey disconnect) and the smooth post represents “liquid out” (black disconnect). A pin-lock corny keg will also usually have notches on the “gas in” connector. You can confirm gas vs liquid by checking the dip tube lengths (gas tube is short; liquid tube is long).
- Hook up lines correctly: Run gas from the regulator to the gas post and run beer lines from the liquid post to your picnic tap or faucet.
- Set pressure and stay safe: Start most beers at 8 to 14 psi at kegerator temperatures and always stay under the keg’s noted max working pressure so the PRV can do its job.
Carbonation: Fast vs Set-and-Forget
If you want to know how to carbonate beer in a corny keg with minimal risk, “set and forget” is the best default. Chill the keg to serving temperature, match that temperature to a CO₂ chart, set the regulator, and leave it alone for about a week. For faster “force carbonation,” raise the pressure and gently rock the keg, keeping the motion smooth to avoid foam and overcarbonating. If you overshoot, vent the PRV in short bursts and reset the pressure. A carbonation stone or carb lid speeds diffusion. Carbonated water usually needs higher PSI and a well-purged keg. (Serving math, so you don’t have to guess: 5 gal = ~53×12 oz pours (or 40×16 oz) • 3 gal = ~32×12 oz pours • 2.5 gal = ~27×12 oz pours)
Carbonation methods at a glance (corny keg):
- Set-and-forget (best default): 10–14 PSI at ~38°F → ~5–7 days
- Burst / “rock” (fastest, easiest to overdo): 30 PSI for 12–24 hours, then drop to serving PSI → ~1–2 days
- Carb stone (fast diffusion, extra gear): 10–12 PSI through stone (or higher per stone spec), minimal agitation → ~12–48 hours
Quick “don’t ruin it” note: Whatever method you pick, finish at your serving PSI and give it a day to settle before judging.
Fermenting in a Corny Keg (Including Pressure Fermentation)
Fermenting in a corny keg trades easy access for a closed, stainless steel environment. Compared with buckets or conicals, you gain pressure capability, lower oxygen pickup, and a compact footprint, but you lose headspace and some visibility. Many brewers treat fermentation in corny keg shells as a pressure fermenting option rather than a universal default. You can fit a corny keg fermenter lid with a thermowell and use either an airlock or a spunding valve for corny keg pressure control. For clean lagers, a controlled spunding schedule and a short diacetyl rest under pressure give clean results.
Cleaning, Sanitizing & Rebuilds
Consistent cleaning is what keeps a corny keg reliable from one batch to the next. After each batch, fully depressurize, then strip the keg into body, lid, posts, poppets, and dip tubes. Soak everything in warm PBW or similar cleaner, rinse until no film remains, then sanitize just before you refill.
A simple cleaning brush kit with a dip tube brush makes it much easier to remove yeast and hop debris and prevents a clogged dip tube. Reassembly is rebuild time. Keep a rebuild kit with fresh lid, post, and dip tube O-rings, use a thin film of keg lube, and clean beer lines and faucets while the keg soaks.
Fit & Cold-Side Logistics (Fridge / Kegerator / Freezer)
Before you buy equipment, figure out your corny keg measurements instead of guessing. Measure height and width, including the hump, then add clearance for disconnects and hoses. A tall five-gallon corny keg suits most setups, while a shorter three-gallon option is perfect for tight spaces.
The 2-inch reality (why your “it should fit” math fails)
Most “it’ll fit in my fridge/kegerator” plans die on the same detail: you don’t just need keg height and diameter — you need about 2 extra inches of vertical clearance for real-world cold-side logistics.
Here’s what that extra space covers:
- Gas + liquid disconnects add height (and they don’t like being bent hard).
- Hose bend radius needs room so lines don’t kink or pop off.
- Lid/PRV access matters, especially when you’re bleeding pressure, reseating a lid, or swapping posts.
- User error buffer: you want to lift the keg in/out without snagging a QD and ripping a line.
Rule of thumb: If your keg is X inches tall, plan your fridge/kegerator clearance like it’s X + ~2 inches. If you’re tight on space, prioritize side clearance too — you’ll need room for lines to route cleanly without sharp turns.
Common “gotcha” scenarios:
- Mini-fridges: the compressor hump + tight ceiling means the keg technically fits… until you attach disconnects.
- Chest freezers: you’ve got height, but routing lines over the collar can create kinks if you don’t plan the path.
- Towers: vertical rise is fine, but you still need room at the keg for QDs and for service.
Make it painless: Before you buy anything, measure your cold box with a tape, then mock up the height using a box + 2 inches (or stack two 1-inch books) and see if you can still attach and remove disconnects comfortably.
When choosing a high-quality fridge or kegerator to serve as your corny keg cooler, depth and door shape both matter. Be sure to check all the dimensions, whether you’re buying new or used online.
With chest freezers or keezers, sketch the floor, hump, and CO₂ space before committing. Determine how many corny kegs fit comfortably. Leave space for beer lines, valve access, and room to reach the bottom of the keg.
Buying Guide: New vs Used (and Where)
When you scroll corny kegs for sale online, you will usually see a mix of new and used corny kegs. New corny kegs for sale cost more, but you get clean stainless steel, fresh seals, and a guaranteed lack of use. When you compare listings, focus on weld quality, straight shells, solid handles, and clear specs for volume and posts. For many brewers, this peace of mind represents the “buy once, cry once” mentality.
Second-hand corny kegs are cheaper, but you have to inspect every shell. Closely examine all photos of the product, keeping an eye out for dents, rust spots, damaged posts, and bent dip tubes, especially when buying wholesale or bulk pallets. Plan to replace all O-rings as soon as your used corny keg arrives.
Troubleshooting (Fast Flow-Chart)
Most corny keg problems fall into a few patterns. Foamy beer usually means warm lines or warm beer, excessive serving pressure, lines that are too short, or an over carbonated keg. Flat beer points to leaks, low pressure, or simply not enough time on gas. Start by checking your pressure gauge reading and feeling the temperature of the shank and faucet.
Leaks often occur through the PRV in the form of bubbles or slow loss around an O-ring. Relief valve leaking problems can sometimes be fixed with cleaning and a new seal, but do not exceed the rated pressure to “force” a seal.
No pour or very slow pour suggests a clogged dip tube, hop debris at the bottom of the keg, a stuck poppet, or frozen beer lines. If posts will not open, make sure you have the correct deep socket size, verify thread direction, and use controlled heat and lubricant rather than brute force on a notched post.
Frequently Asked Questions
Cornelius Kegs: A Far Cry From “Corny”
Treat every corny keg as pressurized equipment first and beer hardware second. Stay inside the stated pressure limits, keep sanitizer and cleaners in regular rotation, and rebuild seals before they fail instead of after a leak ruins a batch. If you want a simple next step, build a one-page “quick start” checklist that covers leak testing, setup, basic corny keg measurements, and a carbonation plan, and tape it inside your kegerator door.
If you have questions, odd problems, or fit reports for a specific kegerator or mini fridge, share them so other brewers can learn from your setup. When you are ready to go deeper, pair this guide with detailed pieces on kegging basics, building a homebrew kegerator, and cleaning and balancing draft beer lines.
Header Photo Credit: Flickr/Anders Adermark


Comments 0
No Readers' Pick yet.